Maybe you’ve heard of Kubernetes but haven’t explored it any further or you’ve done a bit of research but have yet to test the waters of what it can do. Either way, this step-by-step guide will walk you through setting up a Kubernetes cluster on your own computer and deploy a simple application into the cluster.
Setting up a local Kubernetes cluster is incredibly simple these days, thanks to the wide availability of tools like Minikube, Mikrok8s, Kind etc… Throughout this tutorial we’ll use kind because it’s the fastest to set up with minimal dependencies, as long as you are able to run Docker on your machine.
To make things easier for yourself, you can clone the examples within the tutorial in our public git repository: Kubernetes Hello World.
To get kind working, you need to have Docker installed. On Linux it's best to use your operating system package manager, apt on ubuntu or debian, yum or dnf on Fedora/Centos/RHEL and pacman or yay on Archlinux. On Mac or Windows, use the instructions for your platform from Docker's documentation.
You will also need the kubectl command to interact with the cluster once it's up and running. On Linux, kubectl install instructions are available, including methods to install it, with your Linux distributions' packages manager. But it can be installed easily by using the following commands:
curl -LO https://storage.googleapis.com/kubernetes-release/release/`curl -s https://storage.googleapis.com/kubernetes-release/release/stable.txt` /bin/linux/amd64/kubectl
chmod +x ./kubectl
On a Mac, it should be easy if you use the brew package manager by running brew install kubectl. Further instructions for MacOs are available in Kubernetes MacOs kubectl installation instructions.
On Windows, of course, instructions are also available on the Kubernetes kubectl installation instructions page.
Finally, you will need to get the kind command.
On Linux or Mac you can install it from the Github releases page, much like the kubectl binary, with these commands:
curl -L https://github.com/kubernetes-sigs/kind/releases/download/v0.8.1/kind-linux-amd64 -o kind
chmod +x ./kind
sudo mv ./kind /usr/local/bin/kind
On a Mac, alternatively it can be installed easily using the brew command again, with:
brew install kind
With Windows, either use curl if you have it available...
curl.exe -Lo kind-windows-amd64.exe https://kind.sigs.k8s.io/dl/v0.8.1/kind-windows-amd64
Move-Item .kind-windows-amd64.exe c:some-dir-in-your-PATHkind.exe
... or use the Chocolatey package manager for Windows:
choco install kind
For full up to date instructions on any of these kind installation methods, see the projects Quick Start Guide.
Once all these components are installed, you're ready to create your local Kubernetes cluster.
Kind deploys a Kubernetes instance in a Docker container. If you have other containers running on your system, it's best to stop them as they may conflict with the ports used in this example.
docker ps will show you any containers that are running already. If you have any, you can stop them all at once using:
docker stop $(docker ps -a -q)
First, we need a little configuration to prepare our new Kubernetes node. Make a file as below:
# Save this to 'kind.config.yaml'
kind: Cluster
apiVersion: kind.sigs.k8s.io/v1alpha3
nodes:
- role: control-plane
extraPortMappings:
- containerPort: 30080
hostPort: 80
listenAddress: "0.0.0.0"
protocol: TCP
The extra port mapping is required to allow us to talk to the webserver we will run later on.
kind create cluster --name mycluster --config config/kind.config.yaml --wait 5m
It only takes a few minutes, and after this runs you should see a friendly message telling you your cluster is ready.
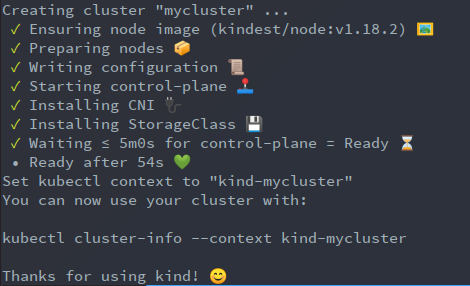
As the output says, the cluster is up and your kubectl command configuration is already set to talk to the cluster.
Now that the cluster is up and running, we can run a process. In this example, we'll run a simple webserver with a "hello world" message of our own creation.
Kubernetes describes all workloads through a simple yaml format file called a "manifest". So, to set up something on the cluster we need to write a yaml file to describe what we want to run.
All the manifests for this example deployment can be found in the repository under the manifests folder.
First, let's describe a workload deployment:
apiVersion: apps/v1
kind: Deployment
metadata:
labels:
app: example1
name: example1
spec:
replicas: 1
selector:
matchLabels:
app: example1
template:
metadata:
labels:
app: example1
spec:
containers:
- image: nginx:latest
name: nginx
Write this into a yaml file, or use the file from the Github repository, and use the kubectl command to apply the workload definition.
kubectl apply -f manifests/1_helloworld_deploy.yaml
This will deploy the nginx docker container and run it as a process on the cluster. Confirm it's running by looking at the resulting pod that's running, kubectl get pods. You should see output that looks like the following:
NAME READY STATUS RESTARTS AGE
example1-7466b89f7c-cs4cc 1/1 Running 0 14s
If the "STATUS" field says "Running" it's working as expected.
So, what actually happened?
When you create a deployment in Kubernetes, the number of replicas you want is set in the manifest, each replica is a copy of the containers that are in the spec. This running instance is actually in an object called a 'Pod'. A Pod is one or more containers running in a logical group. This allows for a number of useful arrangements, like using multiple processes to deal with processing batch jobs, shipping logs or metrics, or a process called "initContainers" that runs once to help set up the 'Pod' for operation.
In this instance, we're just running the container for nginx on its own, with no need for any more. The Pod contains our single nginx instance as we intended. We can see the logs of the container as if it were running locally using the following command:
kubectl logs example1-7466b89f7c-cs4cc
You will have to get the id of the running pod from the command above, as this is dynamic and will be specific to your instance. But then you should see logs like below:
/docker-entrypoint.sh: /docker-entrypoint.d/ is not empty, will attempt to perform configuration
/docker-entrypoint.sh: Looking for shell scripts in /docker-entrypoint.d/
/docker-entrypoint.sh: Launching /docker-entrypoint.d/10-listen-on-ipv6-by-default.sh
10-listen-on-ipv6-by-default.sh: Getting the checksum of /etc/nginx/conf.d/default.conf
10-listen-on-ipv6-by-default.sh: Enabled listen on IPv6 in /etc/nginx/conf.d/default.conf
/docker-entrypoint.sh: Launching /docker-entrypoint.d/20-envsubst-on-templates.sh
/docker-entrypoint.sh: Configuration complete; ready for start up
These logs show scripts that run when the container starts up, we will re-visit this later when we've visited our homepage, to see the log entries show up.
The process is running, so how do we visit the page? Kubernetes offers a powerful service layer to route connections to containers it runs. When you run your Pod, you need to specify the ports that it will map onto your container. Then you create a Kubernetes resource called a 'Service' that will direct requests to processes running in your Pods.
How do you do this? First let's add the port definitions to the Deployment Pod specification. Replace the spec block from your yaml file with the lines below:
spec:
containers:
- image: nginx:latest
name: nginx
ports:
- containerPort: 80
name: nginx
Then, apply this file as you did before. For convenience in the git repository we have an example of the file:
kubectl apply -f manifests/2_helloworld_deploy_ports.yaml
To see the change happen, you may be able to see the Pod be replaced if you are quick enough. run kubectl get pods and you may see something like:
NAME READY STATUS RESTARTS AGE
example1-7466b89f7c-cs4cc 1/1 Terminating 0 13h
example1-9f8f59464-x9ntp 1/1 Running 0 2s
The 'Terminating' instance may be visible for a very short time, otherwise you will just see the new Pod already running without the old Pod in Terminating state. This is how deployments are updated in Kubernetes, allowing for rolling upgrades of configuration or container versions.
Now that the Pod is set up to receive requests on the port we want, we need to create the Service. We'll use the generally preferred method, create a service defined in a yaml file, which should look like this:
apiVersion: v1
kind: Service
metadata:
name: example1
labels:
app: example1
spec:
type: NodePort
selector:
app: example1
ports:
- protocol: TCP
targetPort: 80
port: 80
nodePort: 30080
Again, an example is provided in the GitHub repository, so you can apply the example manifest or your own file like so:
kubectl apply -f manifests/3_helloworld_service.yaml
Once you've done this you should see the Service (if you get Services):
$> kubectl get services
NAME TYPE CLUSTER-IP EXTERNAL-IP PORT(S) AGE
example1 NodePort 10.97.195.99 <none> 80:30080/TCP 4s
kubernetes ClusterIP 10.96.0.1 <none> 443/TCP 15m
You will notice two Services, 1) your example and 2) the Kubernetes Service. This is normal, kind exposes the Service you are using to communicate with the cluster in this way.
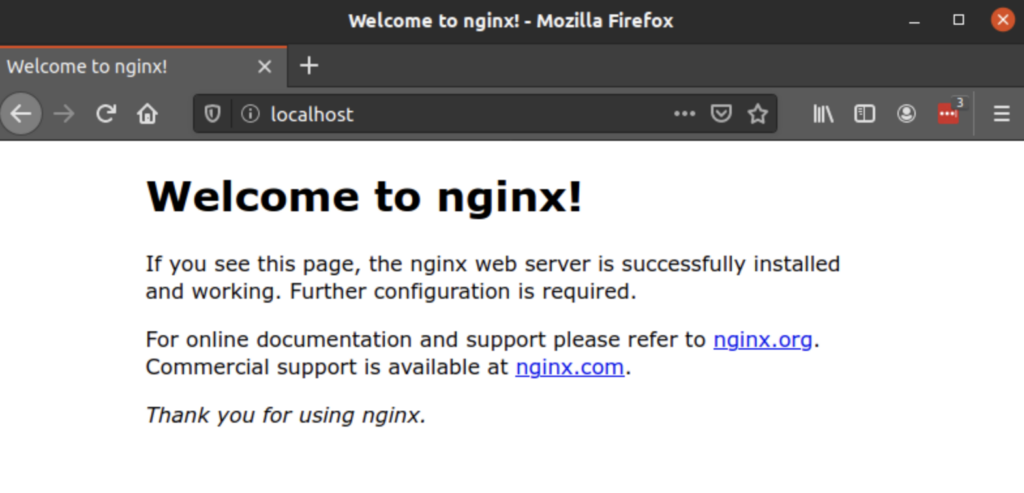
Now you have your service up and running. Lets see it in a browser, open up the url to http://localhost and hit enter, you should see something like this:
"But I want a custom page of my own design", you might say. Let's add our own custom html page to the deployment.
The typical way custom content reaches a Kubernetes cluster is by publishing a container with the content bundled to a registry. Many of these exist, such as dockerhub.com, AWS's ECR (Elastic Container Registry), Google's container registry or even a self hosted registry. All of these are outside the scope of this article so we are going to pass content into the existing nginx container with a Kubernetes resource called a configmap.
These resources are a useful way for passing in config files to processes inPpods, but in this case, we're going to use one to supply a replacement index.html file to the nginx default /usr/share/nginx/html web server file path.
For convenience there is a html file in the html/ folder in the git repository. Add the config map using this command.
kubectl create configmap index.html --from-file html/index.html
You can see it created successfully using the command kubectl get configmaps which should show the result below:
NAME DATA AGE
index.html 1 33s
To see what is in the configmap for your own curiosity, you can run kubectl describe configmap index.html.
Now we just need to tell the nginx Pod to read from this configmap for its content. Let's update the deployment file one more time to add a Volume mount, essentially treating the content of the content map like a mountable file inside the file system of the nginx container.
Update your yaml file with the new content below at the end of the file:
volumeMounts:
- name: htmlcontent
mountPath: "/usr/share/nginx/html/"
readOnly: true
volumes:
- name: htmlcontent
configMap:
name: index.html
items:
- key: index.html
path: index.html
...or use the file in the Github repository and apply the change to your deployment with the command as below.
kubectl apply -f manifests/4_helloworld_deploy_content.yaml
Finally we will see the deployment update which can be done with kubectl get pods which again we can see a Terminating pod being replaced with a new Pod.
NAME READY STATUS RESTARTS AGE
example1-587454c8fb-4llk9 1/1 Terminating 0 177m
example1-566dd9577f-j48bh 1/1 Running 0 2s
Finally you can view the updated content on our localhost page in your browser and see the lovely branded helloworld page.
Now for your own enjoyment, try updating the html/index.html file with your own text. Update the configmap with your new content, this requires a little command line trickery, but with the following command you can replace the existing configmap content with your new index.html file content.
kubectl create configmap index.html --from-file html/index.html -oyaml --dry-run | kubectl replace -f -
To get the nginx Pod to reload mounting the new value of the configmap, you need to get the pod to recreate. Do this using the following command:
kubectl rollout restart deployment example1
This will tell the deployment to re-deploy its pods, so if you do kubectl get pods again, you will see the rolling change happening.
NAME READY STATUS RESTARTS AGE
example1-566dd9577f-j48bh 1/1 Running 0 14m
example1-78df6fc9ff-l98cg 0/1 ContainerCreating 0 3s
Reload your browser and you will see your clever and witty message!
When you are all done with the test cluster, you can clean it up easily by using the following command:
kind delete cluster --name mycluster
This deletes the Docker container that is running your cluster, and thankfully clears up the kubectl config file for you too so you don't have to worry about cleaning up your home .kube/config file.
You've made great headway in deploying your first Kubernetes cluster, so continue learning about Kubernetes with our foundational Guide to Kubernetes.